Hi, in this tutorial i will build a complete real time video chat using BlazeDS and Red 5, so i will split this tutorial in 4 parts each of this are:
Requirements:
Setting up the environment and making the connection:To get started you need to download and install red5 and the red5 plug-in, for make things easy i found two well explained tutorials:
Note: If you are not very familiar with BlazeDS read my post Connect BlazeDS with Java (spanish)
In FlashBuilder 4, we need to setup Red5 Server for doing this go to Window -> Preferences go to Server and finally to Server Runtime Environments, click Add and if your installation of Red5 plug-in is ok, your screen should be like this:
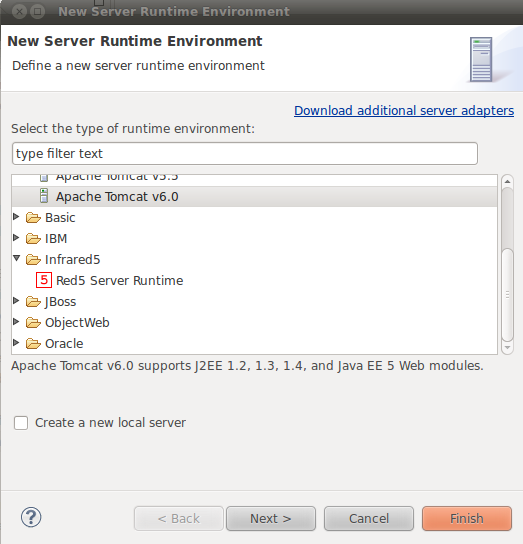
Select Red 5 Server Runtime and hit Next >

- Setting up the environment and making the connection.
- Tracking all the current users.
- Red5 video streaming.
- BlazeDS chat.
Requirements:
- BlazeDS
- Flash Builder 4, in this tutorial i use the eclipse plug-in version.
- Red5 server.
- Red5 eclipse plug-in.
- Previous Java and Flex knowledge.
Setting up the environment and making the connection:To get started you need to download and install red5 and the red5 plug-in, for make things easy i found two well explained tutorials:
- Install red5 server http://code.google.com/p/red5/ (Here are the installers for your specific platform it's very easy just download and install)
- Install red5 plug-in http://red5.org/wiki/Red5Plugin
Note: If you are not very familiar with BlazeDS read my post Connect BlazeDS with Java (spanish)
In FlashBuilder 4, we need to setup Red5 Server for doing this go to Window -> Preferences go to Server and finally to Server Runtime Environments, click Add and if your installation of Red5 plug-in is ok, your screen should be like this:
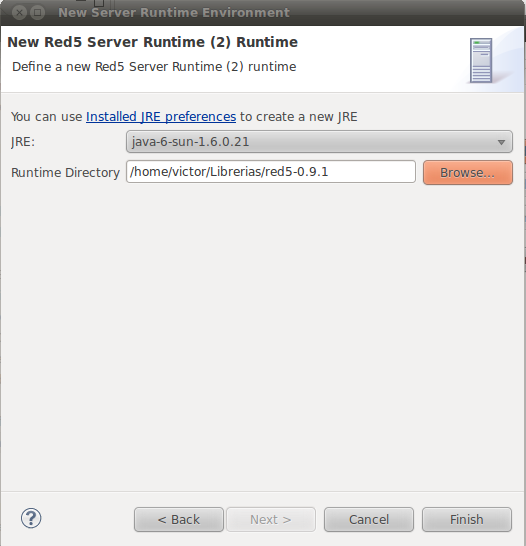
In Runtime Directory select the place where you installed red5 server, click Finish.
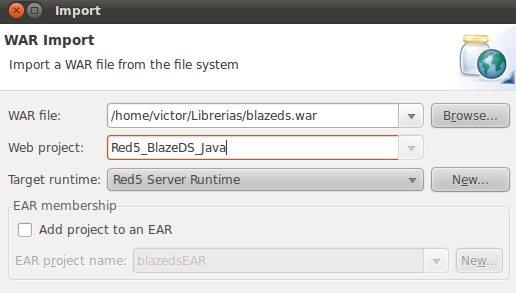
Now go to File Import... then under Web select WAR file, click next.
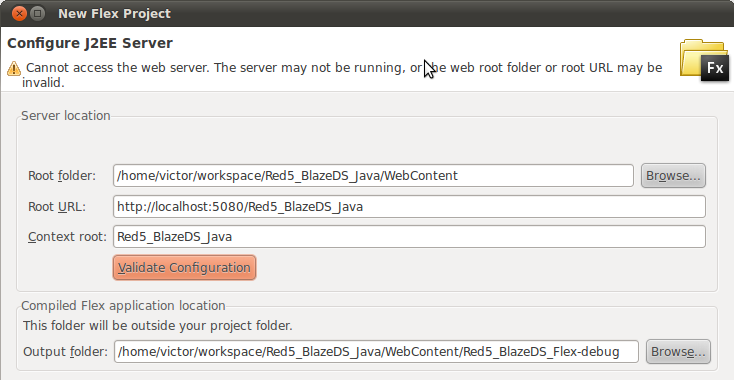
The click Next, now we are going to configure J2EE Server:
Now we must add some content in out web.xml, note that we have the default web.xml for BlazeDS
the only thing we have to do is add some red5 specific lines of code
<?xml version="1.0" encoding="UTF-8"?>
<!DOCTYPE web-app PUBLIC "-//Sun Microsystems, Inc.//DTD Web Application 2.3//EN" "http://java.sun.com/dtd/web-app_2_3.dtd">
<web-app>
<display-name>BlazeDS</display-name>
<description>BlazeDS Application</description>
<context-param>
<param-name>webAppRootKey</param-name>
<param-value>/Red5_BlazeDS_Java</param-value>
</context-param>
<!-- Http Flex Session attribute and binding listener support -->
<listener>
<listener-class>flex.messaging.HttpFlexSession</listener-class>
</listener>
<!-- MessageBroker Servlet -->
<servlet>
<servlet-name>MessageBrokerServlet</servlet-name>
<display-name>MessageBrokerServlet</display-name>
<servlet-class>flex.messaging.MessageBrokerServlet</servlet-class>
<init-param>
<param-name>services.configuration.file</param-name>
<param-value>/WEB-INF/flex/services-config.xml</param-value>
</init-param>
<load-on-startup>1</load-on-startup>
</servlet>
<servlet>
<servlet-name>gateway</servlet-name>
<servlet-class>
org.red5.server.net.servlet.AMFGatewayServlet
</servlet-class>
<load-on-startup>1</load-on-startup>
</servlet>
<servlet-mapping>
<servlet-name>gateway</servlet-name>
<url-pattern>/gateway</url-pattern>
</servlet-mapping>
<servlet-mapping>
<servlet-name>MessageBrokerServlet</servlet-name>
<url-pattern>/messagebroker/*</url-pattern>
</servlet-mapping>
<welcome-file-list>
<welcome-file>index.html</welcome-file>
<welcome-file>index.htm</welcome-file>
</welcome-file-list>
<security-constraint>
<web-resource-collection>
<web-resource-name>Forbidden</web-resource-name>
<url-pattern>/streams/*</url-pattern>
</web-resource-collection>
<auth-constraint/>
</security-constraint>
</web-app>
That's all the configuration you need. Now let's code a little.
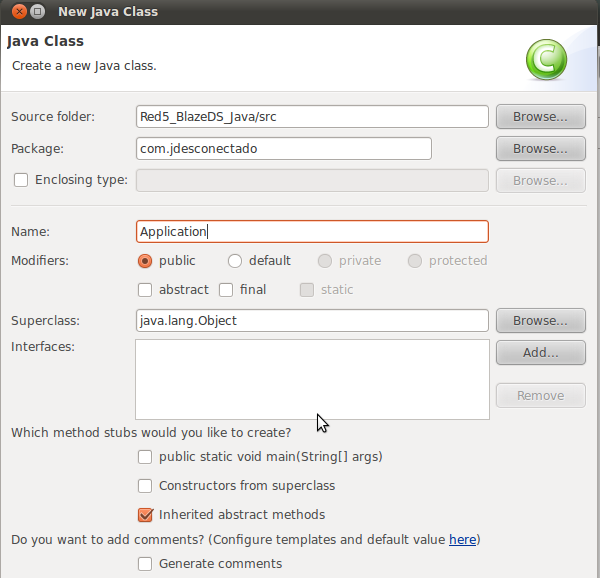
First create a package in out Java src folder: in my case it will be com.jdesconectado, next create a class called Application.
Now go to File Import... then under Web select WAR file, click next.
In WAR file -> Select your blazeds.war library
Web project -> Put he name of your Project.
Target Runtime -> Don't forget to select Red5 Server Runtime.
Click finish, this finish the Java side.
Now let's setup the Flex Side.
Create a new Flex Project, with this settings:

Web project -> Put he name of your Project.
Target Runtime -> Don't forget to select Red5 Server Runtime.
Click finish, this finish the Java side.
Now let's setup the Flex Side.
Create a new Flex Project, with this settings:
Be careful when put the values, in Root folder you must specify the WebContent folder of the Java project you just made in the last step. In Root Url the port must be 5080 (default port of red5), and specify the context name of the Java project in this case Red5_BlazeDS_Java, in the context root put the same context root of the Java application Red5_BlazeDS_Java, click validate and then click finish.
The result will be this:

Now we must setup the configuration files for Red5, in the Java project under the WEB-INF folder create a new File called red5-web.properties put in this file.
webapp.contextPath=/Red5_BlazeDS_Java
webapp.virtualHosts=localhost, 127.0.0.1
Create another file now call this red5-web.xml put in this file:
<?xml version="1.0" encoding="UTF-8"?>
<!DOCTYPE beans PUBLIC "-//SPRING//DTD BEAN//EN" "http://www.springframework.org/dtd/spring-beans.dtd">
<beans>
<bean id="placeholderConfig" class="org.springframework.beans.factory.config.PropertyPlaceholderConfigurer">
<property name="location" value="/WEB-INF/red5-web.properties" />
</bean>
<bean id="web.context" class="org.red5.server.Context"
autowire="byType" />
<bean id="web.scope" class="org.red5.server.WebScope"
init-method="register">
<property name="server" ref="red5.server" />
<property name="parent" ref="global.scope" />
<property name="context" ref="web.context" />
<property name="handler" ref="web.handler" />
<property name="contextPath" value="${webapp.contextPath}" />
<property name="virtualHosts" value="${webapp.virtualHosts}" />
</bean>
<!--
Defines the web handler which acts as an applications endpoint
-->
<bean id="web.handler"
class="com.jdesconectado.Application"
singleton="true" />
</beans>
In the last part of the document we specify were is the endpoint for the application.
The result will be this:
Now we must setup the configuration files for Red5, in the Java project under the WEB-INF folder create a new File called red5-web.properties put in this file.
webapp.contextPath=/Red5_BlazeDS_Java
webapp.virtualHosts=localhost, 127.0.0.1
Create another file now call this red5-web.xml put in this file:
<?xml version="1.0" encoding="UTF-8"?>
<!DOCTYPE beans PUBLIC "-//SPRING//DTD BEAN//EN" "http://www.springframework.org/dtd/spring-beans.dtd">
<beans>
<bean id="placeholderConfig" class="org.springframework.beans.factory.config.PropertyPlaceholderConfigurer">
<property name="location" value="/WEB-INF/red5-web.properties" />
</bean>
<bean id="web.context" class="org.red5.server.Context"
autowire="byType" />
<bean id="web.scope" class="org.red5.server.WebScope"
init-method="register">
<property name="server" ref="red5.server" />
<property name="parent" ref="global.scope" />
<property name="context" ref="web.context" />
<property name="handler" ref="web.handler" />
<property name="contextPath" value="${webapp.contextPath}" />
<property name="virtualHosts" value="${webapp.virtualHosts}" />
</bean>
<!--
Defines the web handler which acts as an applications endpoint
-->
<bean id="web.handler"
class="com.jdesconectado.Application"
singleton="true" />
</beans>
In the last part of the document we specify were is the endpoint for the application.
the only thing we have to do is add some red5 specific lines of code
<?xml version="1.0" encoding="UTF-8"?>
<!DOCTYPE web-app PUBLIC "-//Sun Microsystems, Inc.//DTD Web Application 2.3//EN" "http://java.sun.com/dtd/web-app_2_3.dtd">
<web-app>
<display-name>BlazeDS</display-name>
<description>BlazeDS Application</description>
<context-param>
<param-name>webAppRootKey</param-name>
<param-value>/Red5_BlazeDS_Java</param-value>
</context-param>
<!-- Http Flex Session attribute and binding listener support -->
<listener>
<listener-class>flex.messaging.HttpFlexSession</listener-class>
</listener>
<!-- MessageBroker Servlet -->
<servlet>
<servlet-name>MessageBrokerServlet</servlet-name>
<display-name>MessageBrokerServlet</display-name>
<servlet-class>flex.messaging.MessageBrokerServlet</servlet-class>
<init-param>
<param-name>services.configuration.file</param-name>
<param-value>/WEB-INF/flex/services-config.xml</param-value>
</init-param>
<load-on-startup>1</load-on-startup>
</servlet>
<servlet>
<servlet-name>gateway</servlet-name>
<servlet-class>
org.red5.server.net.servlet.AMFGatewayServlet
</servlet-class>
<load-on-startup>1</load-on-startup>
</servlet>
<servlet-mapping>
<servlet-name>gateway</servlet-name>
<url-pattern>/gateway</url-pattern>
</servlet-mapping>
<servlet-mapping>
<servlet-name>MessageBrokerServlet</servlet-name>
<url-pattern>/messagebroker/*</url-pattern>
</servlet-mapping>
<welcome-file-list>
<welcome-file>index.html</welcome-file>
<welcome-file>index.htm</welcome-file>
</welcome-file-list>
<security-constraint>
<web-resource-collection>
<web-resource-name>Forbidden</web-resource-name>
<url-pattern>/streams/*</url-pattern>
</web-resource-collection>
<auth-constraint/>
</security-constraint>
</web-app>
That's all the configuration you need. Now let's code a little.
First create a package in out Java src folder: in my case it will be com.jdesconectado, next create a class called Application.
Now in this file put the following:
package com.jdesconectado;
import org.red5.server.adapter.ApplicationAdapter;
import org.red5.server.api.IConnection;
import org.red5.server.api.IScope;
public class Application extends ApplicationAdapter{
@Override
public synchronized boolean connect(IConnection conn, IScope scope,
Object[] params) {
// TODO Auto-generated method stub
return super.connect(conn, scope, params);
}
@Override
public synchronized void disconnect(IConnection conn, IScope scope) {
// TODO Auto-generated method stub
super.disconnect(conn, scope);
}
}
That's all for the server side now let's make the client part.
In the flex project add to the Red5_BlazeDS_Flex.mxml
<?xml version="1.0" encoding="utf-8"?>
<s:Application xmlns:fx="http://ns.adobe.com/mxml/2009"
xmlns:s="library://ns.adobe.com/flex/spark"
xmlns:mx="library://ns.adobe.com/flex/mx" minWidth="955" minHeight="600">
<fx:Script>
<![CDATA[
import mx.controls.Alert;
private var connection:NetConnection;
protected function btnConnect_clickHandler(event:MouseEvent):void
{
connection = new NetConnection();
connection.connect("rtmp://localhost/Red5_BlazeDS_Java");
connection.addEventListener(NetStatusEvent.NET_STATUS, onConnectionStatus);
connection.client = this;
}
protected function onConnectionStatus(event:NetStatusEvent):void {
if(event.info.code == "NetConnection.Connect.Success"){
Alert.show("Connection is successfully established");
}else{
Alert.show("Connection fail");
}
}
]]>
</fx:Script>
<s:Button id="btnConnect" label="Connect" click="btnConnect_clickHandler(event)"/>
</s:Application>
Now run the application and hit the button, your application must display the following:
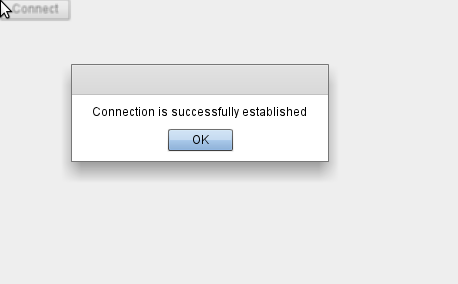
Congratulations you have configure and run your first Red5 + BlazeDS application. In the next part i will show you how to track the current users in your application.
Here are the complete files for the tutorial, if you are going to use this files, setup it correctly first.
Complete source code.
If you found any error or have any suggestion, please let me know.