Mostrando entradas con la etiqueta Red5. Mostrar todas las entradas

jueves, 3 de febrero de 2011

Realtime Data Synchronization between Flex and Air for Android using Red5

After a January break, i going to write more about Air for Android specifically targeting to Realtime data synchronization, in this post i'm going to show you how you can synchronize Adobe Air with Adobe Air for Android in true realtime using Red5 RTMP.

Requirements:
  • Adobe Flash Builder Burrito Preview.
  •  Flex 4.5 "Hero" (Comes with Flash Builder Burrito)
  • Red5 Server.
  • Eclipse 3.4+ with Red5 Plugin installed. If you don't know how to install here is a little tutorial.
  • Some basic AS3 knowledge is recommended. 
Hardware:
  • Toshiba dualcore laptop 6gb ram running windows 7.
  • Google Nexus S smartphone with Air for Android installed.  
 So let's code.

Server Side:
If you successfully install Red5 plugin into eclipse, this part will be straightforward. Create a new Dynamic Web Application and call it MoveServer, set the Target Runtime to Red5, in Configuration click the Modify button and make sure  that Red5 Application Generation is Selected.


Now click finish and the Red5 Plugin will generate two Projects a Java Dynamic Web Application and a Flex application, delete the flex application. Now one more change, go to the red5-web.properties located in under WebContent/Web-INF and add the ip of your machine in your virtualHosts. You might wondering why do this since there is a localhost well when you try to connect from your phone it will try to connect to localhost and since there is no localhost in the phone it will not work.

red5-web.properties
webapp.contextPath=/MoveServer
webapp.virtualHosts=localhost, 127.0.0.1, 192.168.1.2,


Thats all for the server side. Now let's continue with the client side: The application that i will build is pretty simple an image in the screen that uses the phone accelerometer to move around the screen and for the desktop version instead of the accelerometer y use mouse events to move the image this to applications will be synchronize in real time.

Client Side:
In Flash Builder Burrito create a new Flex Mobile Project call this BallMovementMobile and Select Hero has your Flex SDK.


Next target to Google Android, select Blank as the application template and finally uncheck Automatically Reorient, you don't need any server settings so hit finish.


 Now search for any image and use it, i use a soccer ball. Put the image in a assets folder under the src folder


 Now add and image component to your mxml file:

BallMovementMobile.mxml


Now let check if our phone has accelerator and add the event listeners so we can use the accelerometer events, add an creation complete event in your main application tag and add the following:

BallMovementMobile.mxml


The next step is add a net connection and a shared object to out application:

BallMovementMobile.mxml


Some words about the code above:
  • I put the accelerometer.setRequestUpdateInterval to 50 so i can get a faster update from the accelerometer, here you can play with the values to preserve your battery life.
  • In the SharedObject getRemote method i named it "victor" you can put any value you want.
  • The Sync event is where all the magic happens, here all the clients are notified that something has change and they must synchronize with that changes.
 Now let's add the code for sync and accelerometer update events:

BallMovementMobile.mxml


Some words about the code:
  • In the accelerometerUpdate handler i calculate the upper bound and the lower bound for the width and height, then get the x and y values given by the accelerometer, check if the value is not greater than the upper bound or lower than the lower bound and update the image x and y has necessary.
  • When i update the shared object i call it "ballCoordinates" again you can use any word here.
  • In the sync event i get the shared object data and update the image x and y.
  • Finally i add and native deactivate event so the application will not run in the background, again this is for cpu saving. (You can read more Air for Android tips here)
The final step for the mobile application, change the application descriptor properties as follows:

Now create an Air application (not mobile) use the same image and add the following code:


There are a little code differences but it's almost the same application.

Now run both applications and move your phone and the two screens will be synchronized in realtime.

That's all here is the source code for the mobile the desktop and the server application. Here is a quick demo of the application:


Recommendation: When you use the source code please make sure you change the parameters according to your system.

If you have any question or found a mistake or bug please let me know. Thanks

sábado, 4 de diciembre de 2010

Red5 + BlazeDS = Realtime Video Chat Tutorial Part 4: BlazeDS chat.

This is the last part of the Series Red5 + BlazeDS = Realtime Video Chat. In this part we are going to build a normal chat with BlazeDS so users can chat with al the people connected on the application. To accomplish this we need explore the messaging features in BlazeDS and also see a little about Consumer / Producer in Flex.

First in our server side open the services-config.xml and add the following channel:

services-config.xml

        <channel-definition id="my-streaming-amf" class="mx.messaging.channels.StreamingAMFChannel">
        <endpoint url="http://{server.name}:{server.port}/{context.root}/messagebroker/streamingamf"
                class="flex.messaging.endpoints.StreamingAMFEndpoint"/>
               <properties>
                   <idle-timeout-minutes>0</idle-timeout-minutes>
                   <max-streaming-clients>10</max-streaming-clients>
                   <server-to-client-heartbeat-millis>5000</server-to-client-heartbeat-millis>
               </properties>      
        </channel-definition>

In the code above we define a new StreamingAMF channel called my-streaming-channel now we need to specify that we are going to use this channel in our chat, now open the messaging-config.xml and add:

    <destination id="chat">
        <channels>
            <channel ref="my-streaming-amf"/>
        </channels>
    </destination>

We are creating a destination for out chat and specify that our chat will use a Streaming channel. That’s all in our server side, now let’s make an interface for out chat.

Open Red5_BlazeDS_Flex.mxml and add a TextArea and a TextInput inside a form like this:

<s:states>
        <s:State name="login"/>
        <s:State name="main"/>
    </s:states>
    <fx:Declarations>
        <!-- Place non-visual elements (e.g., services, value objects) here -->
    </fx:Declarations>
    <s:Group verticalCenter="0" horizontalCenter="0" includeIn="login">
        <s:Form>
            <s:FormItem label="Username">
                <s:HGroup>
                    <s:TextInput id="txtUsername"/>
                    <s:Button id="btnConnect" label="Login" click="btnConnect_clickHandler(event)"/>
                </s:HGroup>
            </s:FormItem>
        </s:Form>
    </s:Group>
    <s:HGroup width="100%" height="100%" includeIn="main">
        <s:VGroup width="30%" height="100%" paddingBottom="10" paddingLeft="10" paddingRight="10"
                  paddingTop="10">
            <s:Form width="100%">
                <s:FormItem label="Broadcast">
                    <s:HGroup>
                        <s:TextInput id="txtBroadcast"/>
                        <s:Button id="btnBroadcast" label="Broadcast" click="btnBroadcast_clickHandler(event)"/>
                    </s:HGroup>
                </s:FormItem>
            </s:Form>
            <mx:UIComponent id="outVideoWrapper" width="300" height="200"/>
            <s:Form>
                <s:FormItem label="Subscribe">
                    <s:HGroup>
                        <s:TextInput id="txtSubscribe"/>
                        <s:Button id="btnSubscribe" label="Subscribe" click="btnSubscribe_clickHandler(event)"/>
                    </s:HGroup>
                </s:FormItem>
            </s:Form>
            <mx:UIComponent id="inVideoWrapper" width="300" height="200"/>
        </s:VGroup>
        <s:VGroup width="100%" height="80%" paddingBottom="10" paddingLeft="10" paddingTop="10" paddingRight="10">
            <mx:Form width="100%" height="100%">
                <mx:FormItem width="100%" height="100%">
                    <s:TextArea id="txtConversation" width="100%" height="100%" editable="false"/>
                </mx:FormItem>
                <mx:FormItem  width="100%">
                    <s:TextInput id="txtChat" width="100%" enter="txtChat_enterHandler(event)"/>
                    <s:Button id="btnSend" label="Send" click="btnSend_clickHandler(event)"/>
                </mx:FormItem>
            </mx:Form>
        </s:VGroup>
    </s:HGroup>
    <s:TextArea id="txtLog" width="100%" height="100" color="red" bottom="0"
                editable="false" includeIn="main"/>


Now we must add the chat logic as follows:

  • Add a Producer and Consumer in the declarations tags:

   <fx:Declarations>
        <s:Producer id="producer" destination="chat"/>
        <s:Consumer id="consumer" destination="chat" message="consumer_messageHandler(event)" fault="consumer_faultHandler(event)"/>
        <mx:DateFormatter id="hourFormatter" formatString="KK:NN:SS"/>
    </fx:Declarations>


  • Create the events handlers for txtChat enter event and for btnSend click event:

           protected function btnSend_clickHandler(event:MouseEvent):void
            {
                var message:AsyncMessage = new AsyncMessage();
                message.body = txtChat.text;
                message.headers.user = txtUsername.text;
                producer.send(message);
                txtChat.text = "";
            }


            protected function consumer_messageHandler(event:MessageEvent):void
            {
                var hora:Date = new Date();
                var message:String = event.message.body as String;
                var usuario:String = event.message.headers.user as String;
                txtConversation.text += "[" + hourFormatter.format(hora) + "]" + usuario + " says: " + message + "\n";
            }


            protected function txtChat_enterHandler(event:FlexEvent):void
            {
                var message:AsyncMessage = new AsyncMessage();
                message.headers.user = txtUsername.text;
                message.body = txtChat.text;
                producer.send(message);
                txtChat.text = "";   
            }

            protected function consumer_faultHandler(event:MessageFaultEvent):void
            {
                txtLog.text += event.faultString + "\n";
            }

Now test your application and your application should look like this:

Here is the complete Source code:

<?xml version="1.0" encoding="utf-8"?>
<s:Application xmlns:fx="http://ns.adobe.com/mxml/2009"
               xmlns:s="library://ns.adobe.com/flex/spark"
               xmlns:mx="library://ns.adobe.com/flex/mx"
               creationComplete="initApp()" width="100%" height="100%">
    <fx:Script>
        <![CDATA[
            import mx.collections.ArrayCollection;
            import mx.controls.Alert;
            import mx.events.FlexEvent;
            import mx.managers.PopUpManager;
            import mx.messaging.events.MessageEvent;
            import mx.messaging.events.MessageFaultEvent;
            import mx.messaging.messages.AsyncMessage;
            import mx.rpc.events.FaultEvent;
           
            private var connection:NetConnection;
            private var userWindow:UsersWindow;
            private var timer:Timer;
            //Streams
            private var inStream:NetStream;
            private var outStream:NetStream;
            //Devices
            private var camera:Camera;
            private var microphone:Microphone;
            //Video
            private var inVideo:Video;
            private var outVideo:Video;
           
            private function initApp():void {
                this.systemManager.stage.scaleMode = StageScaleMode.NO_SCALE;
               
            }
            protected function btnConnect_clickHandler(event:MouseEvent):void
            {
                if(txtUsername.text.length >= 3){
                    producer.connect();
                    consumer.subscribe();
                    userWindow = new UsersWindow();
                    timer = new Timer(2000);
                    timer.start();
                    timer.addEventListener(TimerEvent.TIMER, onTimerEvent);
                    currentState = "main";
                    connection = new NetConnection();
                    connection.connect("rtmp://localhost/Red5_BlazeDS_Java", txtUsername.text);
                    connection.addEventListener(NetStatusEvent.NET_STATUS, onConnectionStatus);
                    connection.client = this;
                }else{
                    txtUsername.errorString = "Enter a valid name";
                }
            }
            protected function onTimerEvent(event:TimerEvent):void {
                connection.call("getConnectedClients", new Responder(onResult, onFault));
            }
            protected function onResult(obj:Object):void {
                userWindow.setUsers(new ArrayCollection(obj as Array));
            }
            protected function onFault(obj:Object):void {
                txtLog.text += "Error " + obj.fault.message + "\n";
             }
            protected function onConnectionStatus(event:NetStatusEvent):void {
                if(event.info.code == "NetConnection.Connect.Success"){
                    txtLog.text += "Connection to RTMP successfully established\n";
                    connection.call("getConnectedClients", new Responder(onResult, onFault));
                    userWindow = UsersWindow(PopUpManager.createPopUp(this, UsersWindow, false));
                    PopUpManager.centerPopUp(userWindow);
                    userWindow.usuarioActual = txtUsername.text;
                }else{
                    txtLog.text += "Connection to RTMP fail\n";
                }
            }

            protected function btnBroadcast_clickHandler(event:MouseEvent):void
            {
                if(txtBroadcast.text.length > 3){
                    txtBroadcast.errorString = "";
                    //setup devices
                    camera = Camera.getCamera();
                    microphone = Microphone.getMicrophone();
                    //setup the streams
                    outStream = new NetStream(connection);
                    outStream.attachAudio(microphone);
                    outStream.attachCamera(camera);
                    outStream.publish(txtBroadcast.text);
                    //setup out video
                    outVideo = new Video(300,200);
                    outVideo.attachCamera(camera);
                    outVideoWrapper.addChild(outVideo)
                }else{
                    txtBroadcast.errorString = "Put a valid broadcast name";
                }
            }


            protected function btnSubscribe_clickHandler(event:MouseEvent):void
            {
                if(txtSubscribe.text.length > 3){
                    inStream = new NetStream(connection);
                    inStream.play(txtSubscribe.text);
                    inVideo = new Video(300,200);
                    inVideo.attachNetStream(inStream);
                    inVideoWrapper.addChild(inVideo);
                }
            }


            protected function btnSend_clickHandler(event:MouseEvent):void
            {
                var message:AsyncMessage = new AsyncMessage();
                message.body = txtChat.text;
                message.headers.user = txtUsername.text;
                producer.send(message);
                txtChat.text = "";
            }


            protected function consumer_messageHandler(event:MessageEvent):void
            {
                var hora:Date = new Date();
                var message:String = event.message.body as String;
                var usuario:String = event.message.headers.user as String;
                txtConversation.text += "[" + hourFormatter.format(hora) + "]" + usuario + " says: " + message + "\n";
            }


            protected function txtChat_enterHandler(event:FlexEvent):void
            {
                var message:AsyncMessage = new AsyncMessage();
                message.headers.user = txtUsername.text;
                message.body = txtChat.text;
                producer.send(message);
                txtChat.text = "";   
            }

            protected function consumer_faultHandler(event:MessageFaultEvent):void
            {
                txtLog.text += event.faultString + "\n";
            }

        ]]>
    </fx:Script>
    <s:states>
        <s:State name="login"/>
        <s:State name="main"/>
    </s:states>
    <fx:Declarations>
        <s:Producer id="producer" destination="chat"/>
        <s:Consumer id="consumer" destination="chat" message="consumer_messageHandler(event)" fault="consumer_faultHandler(event)"/>
        <mx:DateFormatter id="hourFormatter" formatString="KK:NN:SS"/>
    </fx:Declarations>
    <s:Group verticalCenter="0" horizontalCenter="0" includeIn="login">
        <s:Form>
            <s:FormItem label="Username">
                <s:HGroup>
                    <s:TextInput id="txtUsername"/>
                    <s:Button id="btnConnect" label="Login" click="btnConnect_clickHandler(event)"/>
                </s:HGroup>
            </s:FormItem>
        </s:Form>
    </s:Group>
    <s:HGroup width="100%" height="100%" includeIn="main">
        <s:VGroup width="30%" height="100%" paddingBottom="10" paddingLeft="10" paddingRight="10"
                  paddingTop="10">
            <s:Form width="100%">
                <s:FormItem label="Broadcast">
                    <s:HGroup>
                        <s:TextInput id="txtBroadcast"/>
                        <s:Button id="btnBroadcast" label="Broadcast" click="btnBroadcast_clickHandler(event)"/>
                    </s:HGroup>
                </s:FormItem>
            </s:Form>
            <mx:UIComponent id="outVideoWrapper" width="300" height="200"/>
            <s:Form>
                <s:FormItem label="Subscribe">
                    <s:HGroup>
                        <s:TextInput id="txtSubscribe"/>
                        <s:Button id="btnSubscribe" label="Subscribe" click="btnSubscribe_clickHandler(event)"/>
                    </s:HGroup>
                </s:FormItem>
            </s:Form>
            <mx:UIComponent id="inVideoWrapper" width="300" height="200"/>
        </s:VGroup>
        <s:VGroup width="100%" height="80%" paddingBottom="10" paddingLeft="10" paddingTop="10" paddingRight="10">
            <mx:Form width="100%" height="100%">
                <mx:FormItem width="100%" height="100%">
                    <s:TextArea id="txtConversation" width="100%" height="100%" editable="false"/>
                </mx:FormItem>
                <mx:FormItem  width="100%" direction="horizontal">
                    <s:TextInput id="txtChat" width="100%" enter="txtChat_enterHandler(event)" />
                    <s:Button id="btnSend" label="Send" click="btnSend_clickHandler(event)"/>
                </mx:FormItem>
            </mx:Form>
        </s:VGroup>
    </s:HGroup>
    <s:TextArea id="txtLog" width="100%" height="100" color="red" bottom="0"
                editable="false" includeIn="main"/>
</s:Application>


Here is the complete project and the other project that I show in the video demo.

So that’s all, this is my first series and I don’t want to be the last. If you found any error or have any suggestion, please let me know. Thanks

Red5 + BlazeDS = Realtime Video Chat Tutorial Part 3: Red5 video streaming

Hi, today i will show you how to enhance the application that we build in Tutorial part 1 and part 2, let add some video and voice to make things a little bit interesting. This tutorial continues part 1 and part 2 so take this parts first before reading this part.

So let's continue...

First we need to know a little about NetConnection and how to attach video and audio to the RTMP connection that we made in the last part of this tutorial. NetConnection comunicates with the server establishing a full duplex open connection in both the server and the client so it's perfect for use with the RTMP protocol.

Let's make some changes in the UI so we can add our camera, open Red5_BlazeDS_Flex.mxml and change the following (some update are made so we can use Flex 4.5 new components)

Red5_BlazeDS_Flex.mxml

<s:states>
        <s:State name="login"/>
        <s:State name="main"/>
    </s:states>
    <fx:Declarations>
        <!-- Place non-visual elements (e.g., services, value objects) here -->
    </fx:Declarations>
    <s:Group verticalCenter="0" horizontalCenter="0" includeIn="login">
        <s:Form>
            <s:FormItem label="Username">
                <s:HGroup>
                    <s:TextInput id="txtUsername"/>
                    <s:Button id="btnConnect" label="Login" click="btnConnect_clickHandler(event)"/>
                </s:HGroup>
            </s:FormItem>
        </s:Form>
    </s:Group>
    <s:HGroup width="100%" height="100%" includeIn="main">
        <s:VGroup width="30%" height="100%" paddingBottom="10" paddingLeft="10" paddingRight="10"
                  paddingTop="10">
            <s:Form width="100%">
                <s:FormItem label="Broadcast" >
                    <s:HGroup>
                        <s:TextInput id="txtBroadcast"/>
                        <s:Button id="btnBroadcast" label="Broadcast" click="btnBroadcast_clickHandler(event)"/>
                    </s:HGroup>
                </s:FormItem>
            </s:Form>
            <mx:UIComponent id="outVideoWrapper" width="300" height="200"/>
            <s:Form>
                <s:FormItem label="Subscribe">
                    <s:HGroup>
                        <s:TextInput id="txtSubscribe"/>
                        <s:Button id="btnSubscribe" label="Subscribe"/>
                    </s:HGroup>
                </s:FormItem>
            </s:Form>
            <mx:UIComponent id="inVideoWrapper" width="300" height="200"/>
        </s:VGroup>
    </s:HGroup>
    <s:TextArea id="txtLog" width="100%" height="100" color="red" bottom="0"
                editable="false" includeIn="main"/>

This code add to our user interface 2 UIComponent this components will be the video wrappers in our application.

Now let’s attach the video, for make this possible we must do some steps:
  1. Make the  connection (done in the last step)
  2. Create the streams in/out
  3. Setup  the devices
  4. Create the video.
First we declare the variables:

In our Red5_BlazeDS_Flex.mxml in after the <s:Script>:

            import mx.collections.ArrayCollection;
            import mx.controls.Alert;
            import mx.managers.PopUpManager;
            private var connection:NetConnection;          
            private var userWindow:UsersWindow;
            private var timer:Timer;
           //Streams             
           private var inStream:NetStream;             
           private var outStream:NetStream;             
           //Devices             
           private var camera:Camera;             
           private var microphone:Microphone;             
           //Video             
           private var inVideo:Video;             
           private var outVideo:Video;

Then we need to add click event to our Broadcast button and then write a click handler function has follow:


           protected function btnBroadcast_clickHandler(event:MouseEvent):void {
                if(txtBroadcast.text.length > 3){
                    txtBroadcast.errorString = "";
                    //setup devices
                    camera = Camera.getCamera(); 
                    microphone = Microphone.getMicrophone();
                    //setup the streams
                    outStream = new NetStream(connection);
                    outStream.attachAudio(microphone);
                    outStream.attachCamera(camera);
                    outStream.publish(txtBroadcast.text);
                    //setup out video
                    outVideo = new Video(300,200);
                    outVideo.attachCamera(camera);
                    outVideoWrapper.addChild(outVideo)
                }else{
                    txtBroadcast.errorString = "Put a valid broadcast name";
                }
            }

Now add click event to our Subscribe button and then write a click handler function has follow:

           protected function btnSubscribe_clickHandler(event:MouseEvent):void
            {                 
                    if(txtSubscribe.text.length > 3){
                          inStream = new NetStream(connection);
                          inStream.play(txtSubscribe.text);
                          inVideo = new Video(300,200);
                          inVideo.attachNetStream(inStream);
                          inVideoWrapper.addChild(inVideo);
                }
            }

Now run your application, write a text to Broadcast and then test this in a different browser client open the same application put in the subscribe textinput the name of your broadcast and voila!! you will have the following:


That's all and of course here is the complete code, If you found any error or have any suggestion, please let me know. 

sábado, 9 de octubre de 2010

Red5 + BlazeDS = Realtime Video Chat Tutorial Part 1: Setting up the environment and making the connection.

Hi, in this tutorial i will build a complete real time video chat using BlazeDS and Red 5, so i will split this tutorial in 4 parts each of this are:
  1. Setting up the environment and making the connection.
  2. Tracking all the current users.
  3. Red5 video streaming.
  4. BlazeDS chat.
So let's start.

Requirements:
  • BlazeDS
  • Flash Builder 4, in this tutorial i use the eclipse plug-in version.
  • Red5 server.
  • Red5 eclipse plug-in.
  • Previous Java and Flex knowledge.
If you want to know more about BlazeDS and Red5 please read the manuals :D

Setting up the environment and making the connection:To get started you need to download and install red5 and the red5 plug-in, for make things easy i found two well explained tutorials:
Once you have red5 and red5 plug-in installed, download BlazeDS.
    Note: If you are not very familiar with BlazeDS read my post Connect BlazeDS with Java (spanish)

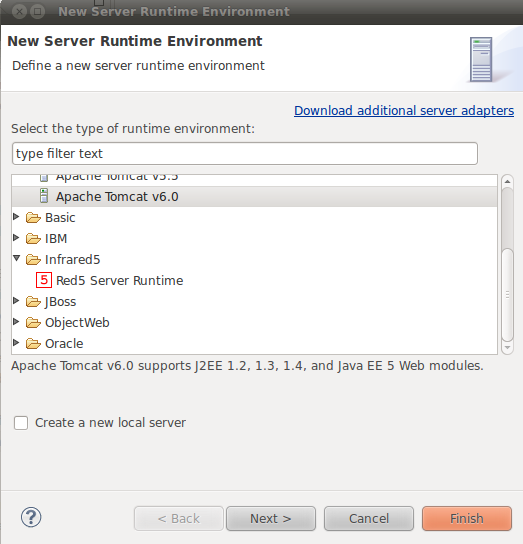
In FlashBuilder 4, we need to setup Red5 Server for doing this go to Window -> Preferences go to Server and finally to Server Runtime Environments, click Add and if your installation of Red5 plug-in is ok, your screen should be like this:


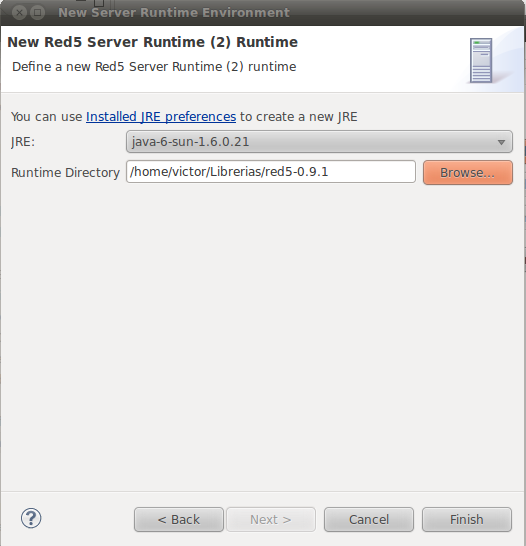
Select Red 5 Server Runtime and hit Next >


In Runtime Directory select the place where you installed red5 server, click Finish.

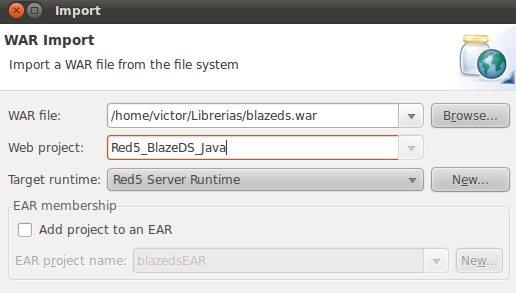
Now go to File Import... then under Web select WAR file, click next.


In WAR file -> Select your blazeds.war library
Web project -> Put he name of your Project.
Target Runtime -> Don't forget to select Red5 Server Runtime.
Click finish, this finish the Java side.

Now let's setup the Flex Side.
Create a new Flex Project, with this settings:


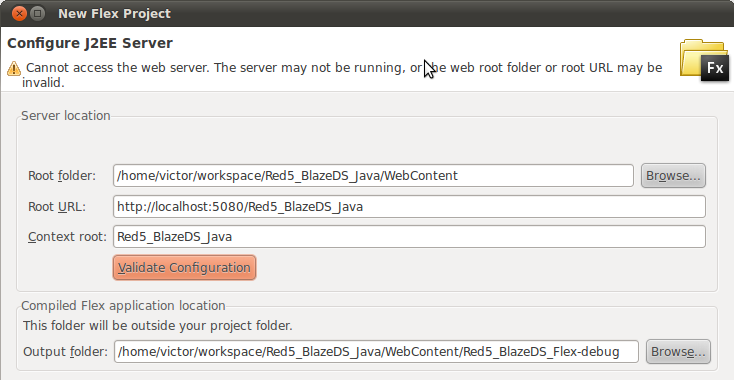
The click Next, now we are going to configure J2EE Server:


Be careful when put the values, in Root folder you must specify the WebContent folder of the Java project you just made in the last step. In Root Url the port must be 5080 (default port of red5), and specify the context name of the Java project in this case Red5_BlazeDS_Java, in the context root put the same context root of the Java application Red5_BlazeDS_Java, click validate and then click finish.

The result will be this:


Now we must setup the configuration files for Red5, in the Java project under the WEB-INF folder create a new File called red5-web.properties put in this file.

webapp.contextPath=/Red5_BlazeDS_Java
webapp.virtualHosts=localhost, 127.0.0.1


Create another file now call this red5-web.xml put in this file:

<?xml version="1.0" encoding="UTF-8"?>
<!DOCTYPE beans PUBLIC "-//SPRING//DTD BEAN//EN" "http://www.springframework.org/dtd/spring-beans.dtd">
<beans>
   
    <bean id="placeholderConfig" class="org.springframework.beans.factory.config.PropertyPlaceholderConfigurer">
        <property name="location" value="/WEB-INF/red5-web.properties" />
    </bean>
   
    <bean id="web.context" class="org.red5.server.Context"
        autowire="byType" />
   
    <bean id="web.scope" class="org.red5.server.WebScope"
         init-method="register">
        <property name="server" ref="red5.server" />
        <property name="parent" ref="global.scope" />
        <property name="context" ref="web.context" />
        <property name="handler" ref="web.handler" />
        <property name="contextPath" value="${webapp.contextPath}" />
        <property name="virtualHosts" value="${webapp.virtualHosts}" />
    </bean>

    <!--
    Defines the web handler which acts as an applications endpoint
    -->
    <bean id="web.handler"
        class="com.jdesconectado.Application"
        singleton="true" />
</beans>

In the last part of the document we specify were is the endpoint for the application.
Now we must add some content in out web.xml, note that we have the default web.xml for BlazeDS
the only thing we have to do is add some red5 specific lines of code

<?xml version="1.0" encoding="UTF-8"?>
<!DOCTYPE web-app PUBLIC "-//Sun Microsystems, Inc.//DTD Web Application 2.3//EN" "http://java.sun.com/dtd/web-app_2_3.dtd">
<web-app>
    <display-name>BlazeDS</display-name>
    <description>BlazeDS Application</description>

    <context-param>
        <param-name>webAppRootKey</param-name>
        <param-value>/Red5_
BlazeDS_Java</param-value>
    </context-param>
    
    <!-- Http Flex Session attribute and binding listener support -->
    <listener>
        <listener-class>flex.messaging.HttpFlexSession</listener-class>
    </listener>
    
    <!-- MessageBroker Servlet -->
    <servlet>
        <servlet-name>MessageBrokerServlet</servlet-name>
        <display-name>MessageBrokerServlet</display-name>
        <servlet-class>flex.messaging.MessageBrokerServlet</servlet-class>
        <init-param>
            <param-name>services.configuration.file</param-name>
            <param-value>/WEB-INF/flex/services-config.xml</param-value>
       </init-param>
        <load-on-startup>1</load-on-startup>
    </servlet>

    <servlet>

        <servlet-name>gateway</servlet-name>
        <servlet-class>
            org.red5.server.net.servlet.AMFGatewayServlet
        </servlet-class>
        <load-on-startup>1</load-on-startup>
    </servlet>


    <servlet-mapping>
        <servlet-name>gateway</servlet-name>
        <url-pattern>/gateway</url-pattern>
    </servlet-mapping>
    

    <servlet-mapping>
        <servlet-name>MessageBrokerServlet</servlet-name>
        <url-pattern>/messagebroker/*</url-pattern>
    </servlet-mapping>
    
    <welcome-file-list>
        <welcome-file>index.html</welcome-file>
        <welcome-file>index.htm</welcome-file>
    </welcome-file-list>

    <security-constraint>
        <web-resource-collection>
            <web-resource-name>Forbidden</web-resource-name>
            <url-pattern>/streams/*</url-pattern>
        </web-resource-collection>
        <auth-constraint/>
    </security-constraint>

</web-app>
That's all the configuration you need. Now let's code a little.

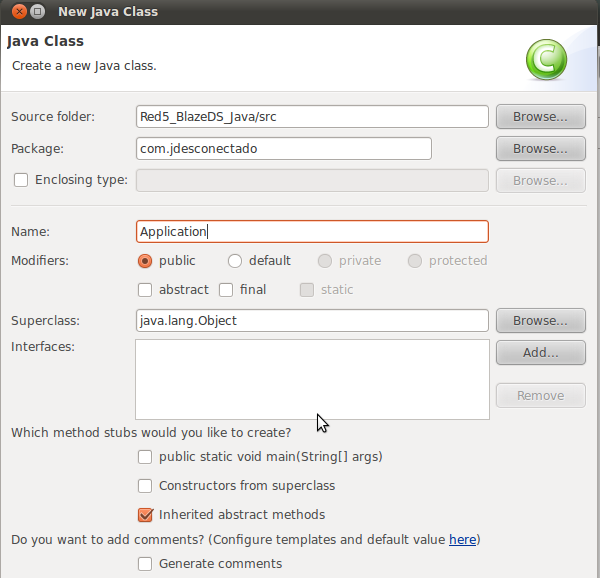
First create a package in out Java src folder: in my case it will be com.jdesconectado, next create a class called Application.


Now in this file put the following:

package com.jdesconectado;

import org.red5.server.adapter.ApplicationAdapter;
import org.red5.server.api.IConnection;
import org.red5.server.api.IScope;

public class Application extends ApplicationAdapter{
    @Override
    public synchronized boolean connect(IConnection conn, IScope scope,
            Object[] params) {
        // TODO Auto-generated method stub
        return super.connect(conn, scope, params);
    }
    @Override
    public synchronized void disconnect(IConnection conn, IScope scope) {
        // TODO Auto-generated method stub
        super.disconnect(conn, scope);
    }
}


That's all for the server side now let's make the client part.

In the flex project add to the Red5_BlazeDS_Flex.mxml

<?xml version="1.0" encoding="utf-8"?>
<s:Application xmlns:fx="http://ns.adobe.com/mxml/2009"
               xmlns:s="library://ns.adobe.com/flex/spark"
               xmlns:mx="library://ns.adobe.com/flex/mx" minWidth="955" minHeight="600">

    <fx:Script>
        <![CDATA[
            import mx.controls.Alert;
            private var connection:NetConnection;
           
            protected function btnConnect_clickHandler(event:MouseEvent):void
            {
                connection = new NetConnection();
                connection.connect("rtmp://localhost/Red5_BlazeDS_Java");
                connection.addEventListener(NetStatusEvent.NET_STATUS, onConnectionStatus);
                connection.client = this;
            }
            protected function onConnectionStatus(event:NetStatusEvent):void {
                if(event.info.code == "NetConnection.Connect.Success"){
                    Alert.show("Connection is successfully established");
                }else{
                    Alert.show("Connection fail");
                }
            }
        ]]>
    </fx:Script>
    <s:Button id="btnConnect" label="Connect" click="btnConnect_clickHandler(event)"/>
</s:Application>

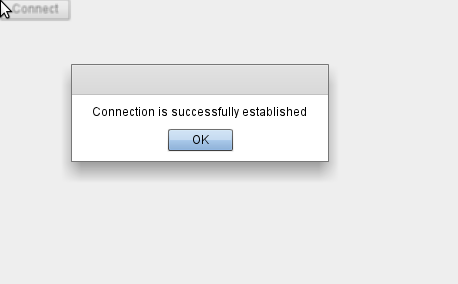
Now run the application and hit the button, your application must display the following:


Congratulations you have configure and run your first Red5 + BlazeDS application. In the next part i will show you how to  track the current users in your application.

Here are the complete files for the tutorial, if you are going to use this files, setup it correctly first.
Complete source code.

If you found any error or have any suggestion, please let me know.